Testing an Ansible role using Test Kitchen
by Alex Harvey
Updated with thanks to Bill Wang for his feedback and pull request.
I have recently experimented with using Test Kitchen and Neill Turner‘s Kitchen Ansible extension to set up automated testing for Ansible roles, and in this post I document the working configuration that I ended up with.
Acknowledgements go to Neill for writing all of these extensions, as well as Martin Etmajer of Dynatrace for his DevOpsDays presentation on this topic, and the Zufallsheld blog post that I’ve borrowed a graphic from.
- Kitchen CI architecture
- How to set this up
Kitchen CI architecture
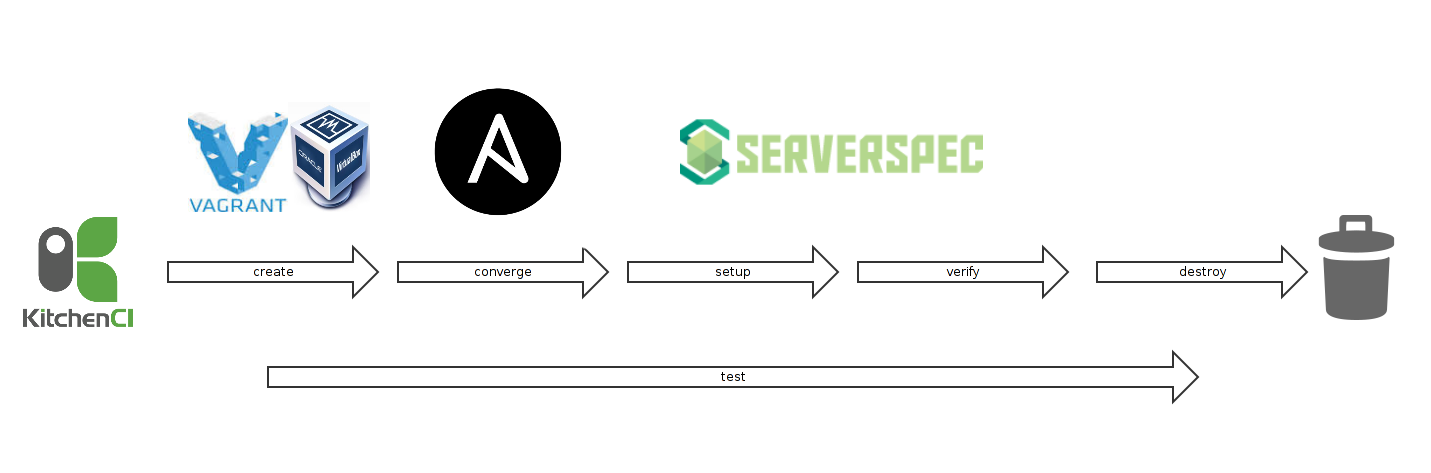
At a high level I have used an architecture that includes Test Kitchen with the kitchen-docker driver, the kitchen-ansible provisioner, which in turn calls Neill’s omnibus-ansible as well as his kitchen-verifier-serverspec test runner to run the Serverspec tests. Use of the kitchen-verifier-serverspec means that I am not dependent on busser runner and therefore have no need to have Chef Omnibus in the picture just to run the tests, which was the case in earlier incarnations of this stack.
How to set this up
I assume that we already have an Ansible role that we want to test, and in my case, I forked a Galaxy module for Sonatype Nexus by jhinrichsen, and added the Kitchen CI configuration. My code is available at Github here.
Prerequisites
I assume we have installed the following:
- Git
- Docker
- Ruby
- Ruby Gems
- Bundler
How to use and install these is out of scope for today, but here’s what I have before we start:
$ git --version
git version 2.5.4 (Apple Git-61)
$ docker -v
Docker version 1.11.1, build 5604cbe
$ ruby -v
ruby 2.0.0p481 (2014-05-08 revision 45883) [universal.x86_64-darwin14]
$ gem -v
2.0.14
$ bundler -v
Bundler version 1.10.5
Gemfile
To begin we need a Gemfile to specify our Ruby dependencies for Bundler:
source 'https://rubygems.org'
gem 'docker'
gem 'test-kitchen'
gem 'kitchen-docker'
gem 'kitchen-ansible'
gem 'kitchen-verifier-serverspec'
To install all of these we use bundle install
$ bundle install
Fetching gem metadata from https://rubygems.org/..........
Fetching version metadata from https://rubygems.org/...
Fetching dependency metadata from https://rubygems.org/..
Resolving dependencies...
Using artifactory 2.3.2
Using backticks 0.4.0
Using docker 0.3.1
Using multipart-post 2.0.0
Using faraday 0.9.2
Using highline 1.7.8
Using thor 0.19.1
Using librarian 0.1.2
Using librarian-ansible 3.0.0
Using net-ssh 3.1.1
Using mixlib-shellout 2.2.6
Using mixlib-versioning 1.1.0
Using mixlib-install 1.0.11
Using net-scp 1.2.1
Using safe_yaml 1.0.4
Using test-kitchen 1.8.0
Using kitchen-ansible 0.42.5
Using kitchen-docker 2.4.0
Using kitchen-verifier-serverspec 0.4.3
Using bundler 1.10.5
Bundle complete! 5 Gemfile dependencies, 20 gems now installed.
Use `bundle show [gemname]` to see where a bundled gem is installed.
A note about kitchen init
Test Kitchen comes with an init action that automates a few of the steps below. If you’d like to try it you’d see output like this:
$ kitchen init --driver=docker --provisioner=ansible_playbook --create-gemfile
      create  .kitchen.yml
      create  chefignore
      create  test/integration/default
      create  .gitignore
      append  .gitignore
      append  .gitignore
      create  Gemfile
      append  Gemfile
      append  Gemfile
You must run `bundle install' to fetch any new gems.
We could delete chefignore again, as that isn’t relevant to us. And we’ll need to tweak all of the other files it has touched. The most useful aspect is the initial .kitchen.yml file that it gives us. Since I’m going to provide all the content we need there, though, there’s really no need for this step, and in what follows, I will assume that you have not run kitchen init.
.gitignore
We’ll want to git-ignore a few files relating Test Kitchen:
$ cat <<EOF > .gitignore
.kitchen/
.kitchen.local.yml
Gemfile.lock
EOF
Test Kitchen will save some state in .kitchen, including SSH keys for logging into the Docker container, logs and other state information. And the .kitchen.local.yml allows us to override settings in the .kitchen.yml, which we’ll discuss below.
Create some directories
We also need to create the directory tree for our integration tests:
$ mkdir -p test/integration/default/serverspec
We’ll add some files to this tree as we go.
The main config file: .kitchen.yml
The main config file, .kitchen.yml, has five sections:
- driver: This is where we configure the Kitchen Driver, in our case that will be kitchen-docker (although you could use, say, kitchen-vagrant if you’re so inclined). This is the component that will create the machine that we’ll use to test our playbook.
- platforms: This is a list of operation systems that we want to test our code on, and it relates to the driver config.
- provisioner: The provisioner is the component that actually configures, or “converges”, the machine. The terminology could be a little confusing here, since it’s really the driver component that takes care of provisioning the VM, whereas our provisioner here does the configuration. So in our case we’ll be using the ansible_playbook provisioner, since it’s the ability of our Ansible playbook to configure a server that we’re interested in actually testing.
- verifier: The verifier is the test runner, and we will be using the new kitchen-verifier-serverspec plugin to use Serverspec.
- suites: This section defines what we want to test. Here we can define a matrix of test suites to run.
The full content of this file will be:
---
driver:
  name: docker

platforms:
  - name: centos-7.2
    driver_config:
      provision_command:
        - yum -y install iproute
      forward:
        - 8082:8082
      image: ansible/centos7-ansible:stable
      platform: centos

provisioner:
  name: ansible_playbook
  hosts: test-kitchen
  ansible_verbose: false
  ansible_verbosity: 2
  require_ansible_repo: false
  require_ansible_omnibus: true
  require_chef_for_busser: false
  requirements_path: requirements.yml
  extra_vars:
    java_packages: ['java-1.8.0-openjdk']

verifier:
  name: serverspec

suites:
  - name: default
    verifier:
      patterns:
        - roles/ansible-nexus/test/integration/default/serverspec/default_spec.rb
      bundler_path: '/usr/local/bin'
      rspec_path: '/usr/local/bin'
Docker driver config
The configuration options available for configuring the Docker driver are found in the project’s README. We want to go with default options where possible, and we have only a single platform that we care about, the latest CentOS 7.
However, as Bill Wang pointed out, we can halve the build time here by using a Docker image with Ansible baked in.
(To use the standard CentOS 7.2 image, just delete the driver_config lines.)
So we add:
---
driver:
  name: docker

platforms:
  - name: centos-7.2
    driver_config:
      image: ansible/centos7-ansible:stable
      platform: centos
Ansible provisioner config
Neill Turner’s kitchen-ansible project is documented in the README and also in its provisioner_options.md file.
Installing Ansible
By default, on a CentOS platform, Ansible will be installed from EPEL. This may be fine, or you may want to have control over exactly which version of Ansible is used.
So for EPEL we don’t need additional config:
provisioner:
  name: ansible_playbook
And to install a specific version via Omnibus Ansible:
provisioner:
  name: ansible_playbook
  require_ansible_repo: false
  require_ansible_omnibus: true
  ansible_version: 1.9.6
If ansible_version is omitted, Omnibus Ansible defaults to using the latest stable version, which is also the config I have chosen.
Update: there appears to be a bug at the moment that prevents this feature working if the Docker container already contains Ansible, see here.
Specifying requirements
Kitchen Ansible understands how to retrieve role requirements both using the requirements.yml file as well as Librarian-ansible.
I have chosen to use the standard requirements.yml approach and it involves just adding one more line to my config:
provisioner:
  name: ansible_playbook
  ...
  requirements_path: requirements.yml
A note about passing data to required roles
At the time of writing it’s quite awkward to pass data from the role-under-test to any dependencies it may have. There may be a bug in kitchen-ansible or it may be that the issue lies with Ansible itself (see this open question at Stack Overflow and also this question in the mailing list).
In my specific situation, we have a role for Sonatype Nexus and I must pass the JDK version into Jeff Geerling’s geerlingguy.java role.
At the moment, it seems, the only way I can do this is as follows:
# .kitchen.yml

provisioner:
  name: ansible_playbook
  ...
  requirements_path: requirements.yml
  extra_vars:
    java_packages: ['java-1.8.0-openjdk']
# meta/main.yml

---
dependencies:
  - { role: geerlingguy.java }
# requirements.yml

---
- src: geerlingguy.java
At this point, I consider this to be a work-around; it’s my hope that in future versions we will be able to configure via meta/main.yml:
---
# meta/main.yml:

dependencies:
  - { role: geerlingguy.java, java_packages: ['java-1.8.0-openjdk'] }
Provision commands
We also need to use the provision_command option in the driver_config:
provision_command:
  - yum -y install iproute
The iproute package is needed for the ss command which is needed by a Serverspec matcher, and this package is not normally found in most cut down Docker images. I discovered this from experimentation after I found clues in this thread here.
Configuring the verifier
A note about kitchen-verifier-serverspec
At this point we part company with other configurations as we have chosen to use the new kitchen-verifier-serverspec, the first version of which was release in February 2016.
In earlier incarnations of this stack (e.g. in Martin Etmajer’s slideshare presentation), Chef Omnibus was silently installed in order to drive the Busser test runner which would in turn call something like Rspec or Serverspec.
By using kitchen-verifier-serverspec we avoid the need to install Chef and Busser, which speeds things up considerably and removes a lot of complexity.
On the other hand, the new project is, well, new and like all new projects, it is in a state of flux, and some work-arounds are required to get it to work at this point. I would expect the interface and configuration to change in the near future.
Still, I think it’s much better than the old way, so I’m more than happy to be an early adopter.
How to configure
Returning to our .kitchen.yml, we need to update the provisioner section to explicitly tell kitchen-ansible not to install Chef. I would expect this to become the default behaviour in a future version.
provisioner:
  ...
  require_chef_for_busser: false
Then in the verifier section:
verifier:
  name: serverspec
And finally in the suites section:
suites:
  - name: default
    verifier:
      patterns:
        - roles/ansible-nexus/test/integration/default/serverspec/default_spec.rb
      bundler_path: '/usr/local/bin'
      rspec_path: '/usr/local/bin'
So a few things to note about the suites section:
We define an array of test suites, which will correspond to Ansible playbooks that we will define in the next section. For each test suite, we provide some additional configuration that relates to the verifier: patterns: here we define a list of patterns that will be passed to Rspec. Note that this is particularly confusing. Firstly, this path is relative to /tmp/kitchen on the Docker machine (which could be changed if you use the default_path setting). Secondly, note that our role under test will be installed in a directory roles/ in /tmp/kitchen. Finally, and as can be deduced from the second point, the remainder of this path, test/integration/default/serverspec/default_spec.rb, is the spec file’s path relative to the project root. bundler_path and rspec_path: in our configuration, bundler and rspec are installed as gems and they end up in /usr/local/bin. At this point, I don’t know of any way of guessing this in advance for a particular platform. Hopefully a future version of this project will make this all a bit easier to use.
The default playbook
As mentioned, we have defined a single test suite that we named “default”. For this, it is assumed there will be a playbook called test/integration/default/default.yml, i.e. test/integration/default/default.yml.
Here’s my playbook:
---
- hosts: test-kitchen
  - ansible-nexus
Some things to note:
The hosts setting corresponds to the host name we chose in the provisioner section of .kitchen.yml. Finally, we specify the list of roles to include, which would normally be just the role under test.
The serverspec tests
The actual Serverspec tests will live in test/integration/default/serverspec/default_spec.rb:
require 'serverspec'

set :backend, :exec

nexus_version = '2.13.0-01'

['wget', 'createrepo'].each do |pkg|
  describe package(pkg) do
    it { is_expected.to be_installed }
  end
end

describe group('nexus') do
  it { is_expected.to exist }
end

describe user('nexus') do
  it { is_expected.to exist }
  it { is_expected.to belong_to_group 'nexus' }
  it { is_expected.to have_login_shell '/bin/bash' }
end

describe file('/usr/share') do
  it { is_expected.to be_directory }
  it { is_expected.to be_owned_by 'root' }
  it { is_expected.to be_grouped_into 'root' }
end

[
  '/var/nexus',
  '/var/run/nexus',
  "/usr/share/nexus-#{nexus_version}-bundle.tar.gz",
]
.each do |dir|
  describe file(dir) do
    it { is_expected.to be_directory }
    it { is_expected.to be_owned_by 'nexus' }
    it { is_expected.to be_grouped_into 'nexus' }
  end
end

describe file('/etc/init.d/nexus') do
  its(:content) { is_expected.to match /RUN_AS_USER="nexus"/ }
end

describe file("/usr/share/nexus-#{nexus_version}/conf/nexus.properties") do
  its(:content) { is_expected.to match /application-host=0.0.0.0/ }
  its(:content) { is_expected.to match /application-port=8082/ }
  its(:content) { is_expected.to match /nexus-work=\/var\/nexus/ }
end

describe service('nexus') do
  it { is_expected.to be_running }
end

describe port(8082) do
  it { is_expected.to be_listening.with('tcp') }
end
I assume here that the reader already knows Serverspec; if not, consult the official tutorial here.
Running the tests
The kitchen command
A complete tutorial on using Test Kitchen would lead us too far afield; if a Test Kitchen tutorial is what you need, the official tutorial is required reading. We’ll briefly cover the kitchen subcommands that we need to run our tests however.
kitchen list
We can start by running kitchen list to show the state of all the machines we have configured (refer back to the platforms section in .kitchen.yml):
$ bundle exec kitchen list
Instance           Driver  Provisioner      Verifier    Transport  Last Action
default-centos-72  Docker  AnsiblePlaybook  Serverspec  Ssh        <Not Created>
This command can be used any time to tell us the state of our test machine or machines.
kitchen create
Using kitchen create will move testing through to the Last Action=created state; for us, that means it will build and run the Docker machine.
$ bundle exec kitchen create default-centos-72
While there is too much output produced to reproduce here, you’ll see if you run it that it builds the Docker container and also configures SSH keys so that we can login.
(By the way, you’ll find those keys created in the .kitchen directory.)
And after this we can check the state again:
$ bundle exec kitchen list
Instance           Driver  Provisioner      Verifier    Transport  Last Action
default-centos-72  Docker  AnsiblePlaybook  Serverspec  Ssh        Created
kitchen login
We can now use the login command to access our Docker machine:
$ bundle exec kitchen login default-centos-72
$$$$$$ Running legacy login for 'Docker' Driver
[kitchen@5f1ff1d183f8 ~]$
Of course, equally we could login using docker exec -it /bin/bash.
kitchen converge
Next, we use the converge action to have our Ansible playbook provisioner configure the machine. There is too much output to reproduce here, and note that at the time of writing, you can expect to see a lot of ugly debug output coming from kitchen-ansible’s decision-making around how to install Ansible itself.
The converge action is slow, as it installs Omnibus Ansible, including its dependencies pip, EPEL, then it installs the software group “Development Tools”, then all of Ansible’s pip dependencies. How to speed all of this up remains for now an open problem.
(And in a separate post I will describe how I’ve sped it up partially by using Squid Man.)
Finally, when all of this is installed, ansible-playbook is called to run our two plays, and then the command exits. Our status is now:
$ bundle exec kitchen list default-centos-72
Instance           Driver  Provisioner      Verifier    Transport  Last Action
default-centos-72  Docker  AnsiblePlaybook  Serverspec  Ssh        Converged
kitchen setup
The next stage or action is the setup action, which installs Ruby, Bundler and Serverspec, so that the tests can actually be run.
kitchen verify
To actually run the Serverspec tests, we proceed to the verify action:
kitchen destroy
The last action is the destroy action, which simply destroys the Docker machine.
kitchen test
And finally, let us mention the test action. The test action wraps around create, converge, setup, verify, and destroy, and automatically halts if any of these actions fail.
That’s it for now!
tags: ansible - test-kitchen