Integration testing using Ansible and Test Kitchen
by Alex Harvey
Table of contents
- Table of contents
- Introduction
- General approach
- BIND 9 solution
- Ansible role
- Kitchen config
- Zone files
- Creating the BIND 9 master
- Creating the first BIND 9 slave
- The second slave
- Clean up
- Conclusion
Introduction
I recently wrote a master-slave BIND 9 solution using Ansible and in this post I describe a multi-node integration testing approach for the solution using Test Kitchen and Neill Turner‘s Kitchen-Ansible extensions.
To be sure, Test Kitchen lacks proper support for multi-node integration testing, and its maintainers have explained the reasons for the lack of multi-node support in this thread here. Suffice to say, Puppet’s Beaker had multi-node support some five or six years ago, as did Puppet’s earlier, now retired, Rspec-system project.
This lack of multi-node support is, indeed, a quite serious limitation in an otherwise excellent framework. I am encouraged that the team has an issue open to track adding multi-node support here.
General approach
The aforementioned limitation aside, it is still possible to do rudimentary integration testing, as long as we tolerate a few manual steps and design our tests so that all testing on the first node can be completed before testing on the subsequent nodes begins.
In the case of my BIND 9 solution, this means that I’ll write one test suite for the DNS master, a second suite for the first DNS slave, and a third suite for the second DNS slave. The first suite will prove that the DNS master has the BIND 9 packages installed, zone files and other files in place, that the BIND 9 service runs, and that name resolution works. The second suite will prove that a DNS slave is build, and receives a zone transfer as soon as it comes online. The third suite simply proves that more than one DNS slave can be handled by the solution.
The approach would fall short if we had a requirement, say, to add a new DNS record after the master was created, update its serial number, and see that all the slaves received the update. But as I say, it’s a lot better than nothing.
I must acknowledge Maxim Chernyak for documenting the Kitchen hack that this work is based on.
BIND 9 solution
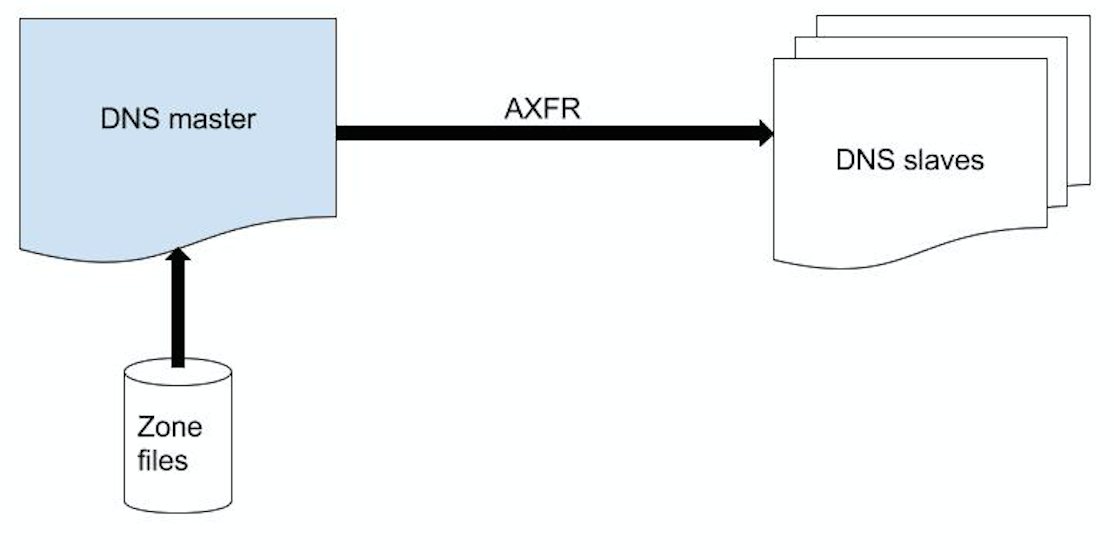
The Ansible role that we will be testing configures a simple BIND 9 system with a single master that is also a master for all of its zones, and one or more slaves that receive the zone tranfers and respond to recursive DNS queries.
The following figure shows the high-level architecture:
Ansible role
The code for this solution is available online at Github here It’s not my intention here to discuss the Ansible code itself, except where it is relevant to the integration testing procedure.
Kitchen config
To learn more about my Kitchen config, please see my earlier post where I described the general config.
The .kitchen.yml file
The .kitchen.yml I have for the role is as follows:
---
driver:
  name: vagrant

platforms:
  - name: centos-7.2
    driver_plugin: vagrant
    driver_config:
      box: puppetlabs/centos-7.2-64-nocm

provisioner:
  name: ansible_playbook
  hosts: test-kitchen
  ansible_verbose: false
  ansible_verbosity: 2
  require_ansible_repo: false
  require_ansible_omnibus: true
  require_chef_for_busser: false

verifier:
  name: serverspec
  bundler_path: '/usr/local/bin'
  rspec_path: '/usr/local/bin'

suites:
  - name: master
    verifier:
      patterns:
        - roles/ansible-bind/test/integration/master/serverspec/master_spec.rb
    driver_config:
      network:
        - ['private_network', {ip: '10.0.0.10'}]
  - name: slave1
    verifier:
      patterns:
        - roles/ansible-bind/test/integration/slave1/serverspec/slave1_spec.rb
    driver_config:
      network:
        - ['private_network', {ip: '10.0.0.11'}]
  - name: slave2
    verifier:
      patterns:
        - roles/ansible-bind/test/integration/slave2/serverspec/slave2_spec.rb
    driver_config:
      network:
        - ['private_network', {ip: '10.0.0.12'}]
This .kitchen.yml configuration deviates from the one described in the previous post in two ways: I have added separate “test suites” for each component in the BIND 9 cluster; and I have used kitchen-vagrant instead of kitchen-docker.
Kitchen vagrant
The reason I have used kitchen-vagrant this time is that BIND 9 on CentOS 7 requires Systemd, and Systemd does not work in Docker, as explained in this thread. I also need the features of the Vagrantfile, in particular the private_networks feature discussed below.
(Note that I have not tried any of the work-arounds to the Docker Systemd issue discussed in the thread I linked, so I don’t really know at this point where it’s possible to achieve a similar result using Docker. Please let me know in the comments if you know how to get all of this to work using Docker!)
Test suites
The Test suites are fairly self-explanatory: we define a private network for each suite so that the BIND 9 components can talk to each other, and Rspec (i.e. Serverspec) spec files to test each of those components.
Zone files
Because we need to build a working BIND 9 system, we need to also create zone files as “fixtures”.
As such, we have created the zone “example.com” and populated it with records for the three name servers and a few fake client records:
# test/fixtures/zones/0.0.10.in-addr.arpa.db

$ORIGIN 0.0.10.IN-ADDR.ARPA.
$TTL 1h
@      IN SOA   ns1.example.com. hostmaster.example.com. (
                  2016010100 ; serial
                  1h         ; refresh
                  15m        ; retry
                  4w         ; expire
                  1h         ; nxdomain ttl
                )

       IN NS   ns1.example.com.
       IN NS   ns2.example.com.
       IN NS   ns3.example.com.

; server host definitions
10     IN PTR  ns1.example.com.
11     IN PTR  ns1.example.com.
12     IN PTR  ns2.example.com.
13     IN PTR  fred.example.com.
14     IN PTR  joe.example.com.
# test/fixtures/zones/example.com.db

$ORIGIN example.com.
$TTL 1h
@      IN SOA   ns1.example.com. hostmaster.example.com. (
                  2016010100 ; serial
                  1h         ; refresh
                  15m        ; retry
                  4w         ; expire
                  1h         ; nxdomain ttl
                )

       IN NS      ns1.example.com.
       IN NS      ns2.example.com.
       IN NS      ns3.example.com.

; Name servers
ns1    IN A       10.0.0.10
ns2    IN A       10.0.0.11
ns3    IN A       10.0.0.12

; non server domain hosts
fred   IN A       10.0.0.13
joe    IN A       10.0.0.14
Creating the BIND 9 master
The master playbook
We define the BIND 9 master playbook that configures or “converges” the master, which is expected to be found in test/integration/suite_name/default.yml:
# test/integration/master/default.yml

---
- hosts: test-kitchen
  pre_tasks:
    - service:
        name=firewalld
        state=stopped
  roles:
    - {
        role:              ansible-bind,
        bind_role:         master,
        notify_source:     '10.0.0.10',
        listen_on:         ['127.0.0.1', '10.0.0.10'],
        allow_recursion:   ['0.0.0.0/0'],
        forwarders:        ['8.8.8.8', '8.8.4.4'],
        slaves:            ['10.0.0.11', '10.0.0.12'],
        named_root:        "{{ role_path ~ '/test/fixtures/named.root' }}",
        zone_files_source: "{{ role_path ~ '/test/fixtures/zones' }}",
        zones:             ['0.0.10.in-addr.arpa', 'example.com'],
      }
  post_tasks:
    - lineinfile:
        dest=/etc/resolv.conf
        line='nameserver 127.0.0.1'
        regexp='.*'
The pre_tasks takes care of stopping the default CentOS 7 firewall.
Next we declare our ansible-bind role, and pass in variables telling it to listen on the loopback address, and its own IP 10.0.0.10. We allow recursion for anywhere in the world, 0.0.0.0/0, which we wouldn’t do in production, but we’re happy to do it in this short-lived test environment. We tell it to forward recursive queries to Google’s DNS servers 8.8.8.8 and 8.8.4.4, and then we provide the named.root file and our example zone files.
The post_tasks is interesting. The /etc/resolv.conf file is initially configured silently by Test Kitchen, and it seems to end up with whatever’s on the host machine. However, for our BIND 9 system to work, our guests need to know to firstly try to resolve recursive queries using our own DNS, so that the BIND 9 servers will forward the queries onto our forwarders 8.8.8.8 and 8.8.4.4.
By putting this in as a post_task, the name resolution works during the provisioning and build phase, and then after the BIND 9 master has come online, resolution is pointed at 127.0.0.1, ready for the Serverspec tests to run.
Serverspec tests
Next I add some Serverspec tests in a file in the location mentioned in .kitchen.yml for this suite:
# test/integration/master/serverspec/master_spec.rb

require 'serverspec'

set :backend, :exec

describe file('/var/log/messages') do
  its(:content) { is_expected.to match /starting BIND/ }
  its(:content) { is_expected.to match /loaded serial 2016010100/ }
  its(:content) { is_expected.to match /all zones loaded/ }
end
Actually, I have created a lot more tests than I’ve shown here, and in the interests of space I have truncated. To see the actual tests the file is here. In addition to what is shown here, I test for files and directories that I expected to exist; patterns in the named.conf file; other patterns in the log file; and I check that the service is running and the ports are listening.
Verifying the master
At this point we can create, converge, set up and verify the BIND 9 master by calling the Kitchen “verify” action:
$ bundle exec kitchen verify master-centos-72
This produces too much output for me to reproduce here, but I do recommend cloning the code and having a look at the output and playing around with this.
Creating the first BIND 9 slave
The slave playbook
Now it is time to create a DNS slave. We create a playbook for the first slave that is similar to the one we created for the master:
# test/integration/slave1/default.yml

---
- hosts: test-kitchen
  pre_tasks:
    - service:
        name=firewalld
        state=stopped
  roles:
    - {
        role:            ansible-bind,
        bind_role:       slave,
        master:          '10.0.0.10',
        listen_on:       ['127.0.0.1', '10.0.0.11'],
        allow_recursion: ['0.0.0.0/0'],
        forwarders:      ['8.8.8.8', '8.8.4.4'],
        named_root:      "{{ role_path ~ '/test/fixtures/named.root' }}",
        zones:           ['0.0.10.in-addr.arpa', 'example.com'],
      }
  post_tasks:
    - lineinfile:
        dest=/etc/resolv.conf
        line='nameserver 10.0.0.10'
        regexp='.*'
This should be self-explanatory after our discussion of the master’s playbook.
Serverspec tests
The Serverspec tests are more interesting for the first slave, as we are now testing for actual integration of the components. Again, I show a truncated file in the interests of space:
require 'serverspec'

set :backend, :exec

describe file('/var/log/messages') do
  its(:content) {
    is_expected.to match
      /transfer of '0.0.10.in-addr.arpa\/IN' from 10.0.0.10#53: Transfer completed:/
  }
  its(:content) {
    is_expected.to match
      /transfer of 'example.com\/IN' from 10.0.0.10#53: Transfer completed:/
  }
end
In this excerpt, I check for the lines in the log file that I care about the most, namely that zone transfers have succeeded.
To see the rest of the file, it is here.
Verifying the first slave
Now we can verify our first slave:
$ bundle exec kitchen verify slave1-centos-72
The second slave
There’s not a whole lot to see in the second slave, and I add it simply to prove that my Ansible code really builds more than one slave. If you’d like to try it:
$ bundle exec kitchen verify slave2-centos-72
Clean up
Having built and integration tested the BIND 9 system in Test Kitchen, it’s now time to clean up all of our VMs:
$ bundle exec kitchen destroy
Done!
Conclusion
In this post we have looked at a method for integration testing a multi-node BIND 9 system using Test Kitchen and Kitchen Ansible. The advantages of this approach are that we can test our infrastructure as we build it in the Test Kitchen’s excellent framework, and also write automated tests to prove the integration of the components. As we have mentioned, it falls short in functionality of Puppet’s Beaker, and we hope that the Test Kitchen team will add proper multi-node support in a future release.
I hope this documentation proves useful to others.
tags: ansible - test-kitchen